Payment Integration: React and Spring Boot with the Stripe API
Take card payments on a React checkout page with Stripe: tokenise the card in the browser, then charge it from a Spring Boot backend with the secret key.
Archive note I wrote this in 2020 on my old blog. It moved here in 2026 with the code and diagrams redone; library versions and APIs may have changed since. Original post.
Contents
In this article we’ll accept payments on a website using Stripe. We’ll focus on the integration between our application and Stripe; you’ll need some basic JavaScript and Spring to follow the details.
The demo is a dummy checkout page: the user clicks Pay Now, enters their card details in Stripe’s pop-up form, and gets an alert once the payment goes through.
The Stripe API
Stripe is one of the major payment platforms for internet businesses. It takes care of payment processing, including fraud detection, so you don’t have to.
To get started, create an account at stripe.com. Your dashboard has two modes: test and live. We’ll use test mode for development; to accept real payments, you verify and activate your account and switch to live mode.
Stripe gives you two keys:
- A publishable key, used in the browser. It can’t be hidden, and doesn’t need to be.
- A secret key, used on your backend server. It must always stay secret.
Here’s how the two keys fit into the payment flow:
We’ll go through it in three parts: the front end, the backend, and the Stripe dashboard.
1. Front end: the React Stripe Checkout component
React Stripe Checkout is a pluggable component that gives us the pay button and handles everything that happens after the user clicks it. First, we set it up:
import React from 'react'
import StripeCheckout from 'react-stripe-checkout'
import axios from 'axios'

const StripeButton = ({ price }) => {
  const publishableKey = 'pk_test_…' // your publishable key
  const stripePrice = price * 100

  const onToken = (token) => {
    axios
      .post('http://localhost:8083/payment', {
        amount: stripePrice,
        token,
      })
      .then((response) => {
        alert('payment success')
      })
      .catch((error) => {
        alert('Payment failed')
      })
  }
  return (
    <StripeCheckout
      amount={stripePrice}
      label="Pay Now"
      name="Wolf Elite"
      billingAddress
      shippingAddress
      image="https://svgshare.com/i/CUz.svg"
      description={`Your total is ${price}`}
      panelLabel="Pay Now"
      token={onToken}
      stripeKey={publishableKey}
      currency="USD"
    />
  )
}

export default StripeButton
The component receives the total price as a prop. We keep the publishable key, and the price in cents, because Stripe takes amounts in the smallest currency unit, not in dollars.
onToken() posts the token and the price to our own backend (on localhost here) using axios. It’s only called once Stripe has returned the token object, which happens behind the scenes.
Finally, the StripeCheckout component renders a button that, when clicked, asks for the customer’s details and card. It’s very configurable: to collect only an email address and card details, remove the billingAddress and shippingAddress props, and the form looks like this:
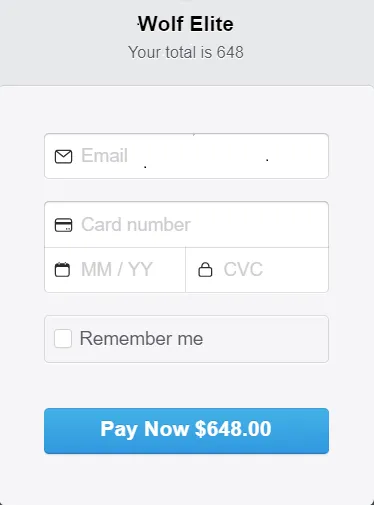
Stripe’s checkout form without the shipping and billing address fields.
All that’s left is to put the button on the checkout page, passing in the price:
<div className="checkout">
  {/* … the rest of the page … */}
  <StripeButton price="648" />
</div>
The Pay Now button on the checkout page opens the pop-up form. The Pay button in the form calls Stripe, then calls onToken once the token comes back.
2. Backend: the Spring Boot REST API
We’ll use Spring Boot to handle requests from the checkout page. Here’s a simple REST controller that accepts the request and passes it to a service:
@RestController
@RequestMapping("/payment")
public class PaymentController {

    @Autowired
    PaymentService service;

    @PostMapping
    public ResponseEntity<String> completePayment(@RequestBody PaymentRequest request) throws StripeException {
        String chargeId = service.charge(request);
        return chargeId != null
                ? new ResponseEntity<String>(chargeId, HttpStatus.OK)
                : new ResponseEntity<String>("Please check the credit card details entered", HttpStatus.BAD_REQUEST);
    }

    @ExceptionHandler
    public String handleError(StripeException ex) {
        return ex.getMessage();
    }
}
And the service that calls Stripe:
@Service
public class PaymentService {

    @Value("${STRIPE_SECRET_KEY}")
    private String secretKey;

    @PostConstruct
    public void init() {
        Stripe.apiKey = secretKey;
    }

    public String charge(PaymentRequest chargeRequest) throws StripeException {
        Map<String, Object> chargeParams = new HashMap<>();
        chargeParams.put("amount", chargeRequest.getAmount());
        chargeParams.put("currency", PaymentRequest.Currency.USD);
        chargeParams.put("source", chargeRequest.getToken().getId());

        Charge charge = Charge.create(chargeParams);
        return charge.getId();
    }
}
We read the secret key from configuration (here, an environment variable) and hand it to the Stripe library. Using the stripe-java Maven dependency, we call Charge.create with our charge parameters. If it succeeds, we get back a charge id, which we pass on to the front end. If it fails, Stripe throws a StripeException and the controller’s exception handler returns its message.
3. The Stripe dashboard
Payments show up on your Stripe dashboard straight away, marked as test data while you’re in test mode.
Conclusion
This is one way to combine React and Stripe checkout; there are plenty of others. PayPal is a popular alternative to Stripe. The full code for this project is on GitHub: shahulbasha/StripePayment.
References
- Stripe Checkout with React (DigitalOcean, originally on alligator.io)
- The Spring Boot reference documentation